A Guide to Sod Installation: Achieving a Flawless Green Lawn
In the pursuit of achieving that flawless green lawn, sod installation is your optimal solution. Start by understanding which type of grass thrives in your local climate. Correct soil preparation is similarly vital; it lays the foundation for your new lawn. But there's additional work than just placing strips of grass. Let's examine the essential steps that will position you for success.
Picking the Right Type of Sod for Your Climate
How do you determine which sod type is best suited for your climate when making a selection? Start with an evaluation of your local climate. Consider Bermuda or Zoysia for warm areas, as these warm-season grasses perform well in heat. Cool-season grasses such as Kentucky Bluegrass or fescue are perfect for cooler climates, where they excel in moderate temperatures. Consider your soil conditions and sun exposure also. Some grasses require full sun, while others tolerate shade. It's essential to choose a sod variety that matches your environment to guarantee a lush, healthy lawn. Keep in mind the maintenance demands; some grasses require more irrigation and trimming than alternatives. Make an informed choice, and you'll set your lawn up for success.
Setting Up Your Soil for Optimal Sod Installation
Prior to installing your new sod, it's crucial to prepare your soil adequately to ensure a thriving lawn. Start by removing the area of any debris, rocks, and old grass. Next, test your soil's pH and nutrient levels; this will help you determine if you need to amend it. If necessary, add organic matter like compost to enhance soil structure and fertility. Rake the soil to create a smooth, level surface, guaranteeing proper drainage. Aerating the soil can also promote root penetration. As a final step, water the area moderately to wet the soil without making it overly saturated. By taking these steps, you'll create a solid foundation for your new sod to prosper and develop a thick, green lawn.
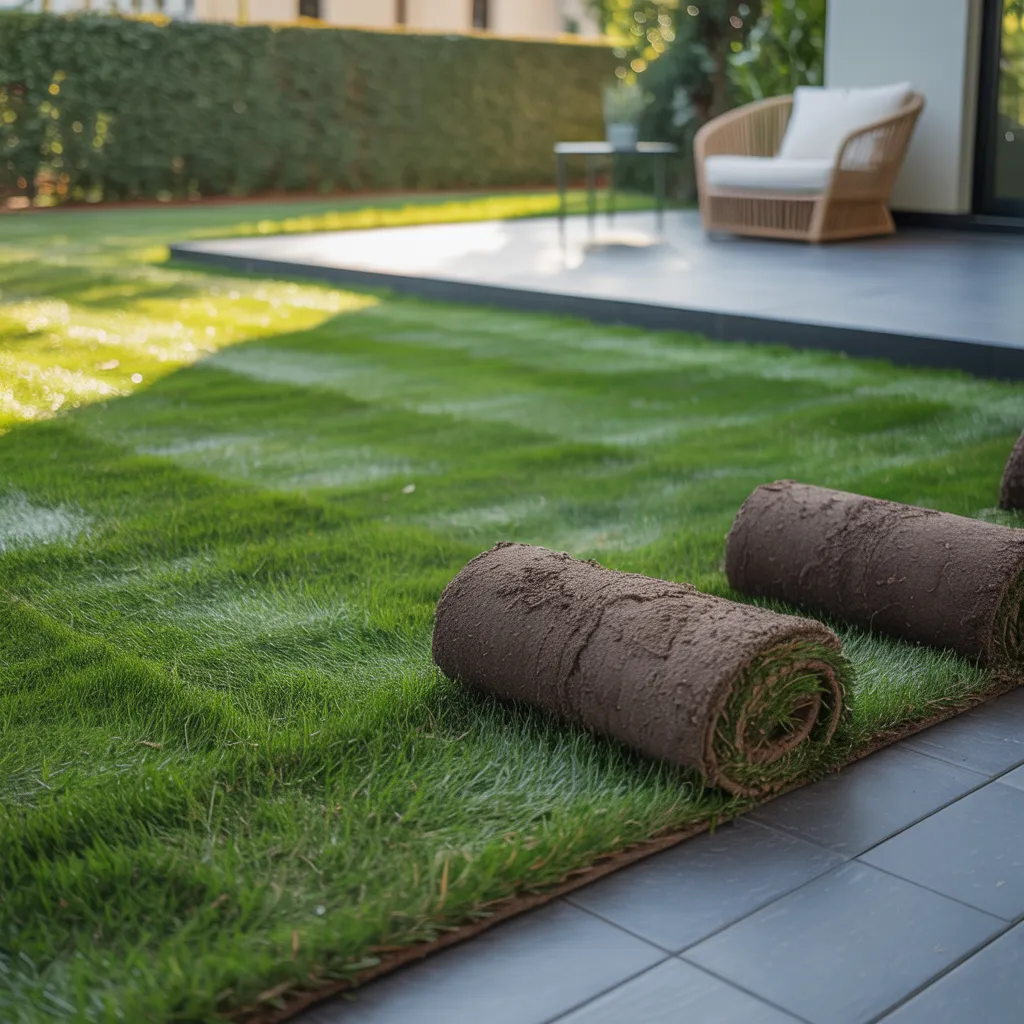
Steps to Properly Lay Your Sod
Now that your soil is ready, it's time to place your sod the right way. You'll want to arrange the pieces in staggered rows for a seamless look, and don't forget to provide regular irrigation. Adhering to these instructions will set you up for a lush and vibrant lawn.
Prepare Your Soil The Right Way
To obtain a lush, healthy lawn, prepping the soil correctly is vital before installing your sod. Begin by clearing the area of any debris, rocks, and weeds. Next, use a garden tiller to loosen the soil to a depth of about 3 to 4 inches, ensuring it's loose and aerated. Following this, level the soil with a rake, filling in any low spots and removing high spots. It's also vital to test the soil's pH and nutrient levels; you may need to add amendments like compost or fertilizer to create ideal growing conditions. As a final step, water the soil gently to help it settle, preparing it for your new sod to thrive.
Position Sod In Staggered Rows
As you prepare to lay your sod, it's essential to do so in staggered rows for optimal coverage and a seamless appearance. Start off by laying your first piece along a straight edge, verifying it fits snugly against any borders. When you position the next piece, offset it by half the length of the previous piece. This staggered pattern assists in eliminate gaps and decreases the chances of weeds popping up later. Maintain this method across the entire area, adjusting pieces as needed to fit around edges or obstacles. Be patient to align each piece carefully, keeping the seams tight. By placing sod in staggered rows, you'll create a rich, uniform lawn that's aesthetically pleasing and healthy.
Regular Watering And Maintenance
Once you've laid your sod, regular watering and maintenance are vital to establish a healthy lawn. Begin by providing your new sod a deep soak straight after installation. For the first two weeks, water it daily, ensuring the soil remains moist but not saturated. Subsequently, you can cut back watering to every other day, depending on the weather.
In addition to watering, monitor your sod for any indicators of stress or pests. Begin mowing when the grass reaches about 3 inches high—never cut more than one-third of the blade at a time. Finally, apply a starter fertilizer after two weeks to stimulate root growth. With proper care, you'll soon enjoy a lush, green important resource lawn.
Watering New Sod: Key Techniques
Watering new sod is essential for establishing a healthy lawn, and doing it correctly can make all the difference. Water the sod immediately after installation to guarantee the roots don't dry out. Aim for about 1 to 1.5 inches of water per week, adjusting based on weather conditions. Throughout the first two weeks, water daily to keep the soil consistently moist; this helps the roots establish. You can lower the frequency to every other day after that. Water early in the morning to reduce evaporation and fungal growth. Pay attention to the edges of your sod, as they often dry out faster. Always inspect the soil moisture by digging a bit to confirm it's adequately hydrated.
Apply Fertilizer to Your Lawn After Installing Sod
To make sure your new sod thrives, fertilizing it soon after installation is essential. A starter fertilizer high in phosphorus will promote root development and help your sod settle in quickly. Spread the fertilizer within a week of laying the sod. Adhere to the package instructions for the proper amount, ensuring you don't apply too much fertilizer, which can hurt your new grass.
Spread the fertilizer evenly, whether by hand or with a broadcast spreader, to avoid patches. Water your sod following fertilizing to help the nutrients soak into the soil. This feeding will provide your sod the nutrients it needs during the essential establishment phase. Make sure to monitor your lawn's progress and adjust your fertilization schedule as needed to keep it vibrant and beautiful.
Don't Make These Frequent Errors When Installing Sod
As you install sod, it's tempting to skip crucial steps that can result in complications down the line. Neglecting proper soil preparation and skipping your watering plan can undo all your labor. Let's look at these common mistakes so you can create a healthy lawn.
Improper Soil Preparation
Adequate soil preparation is crucial for a healthy sod installation, yet many homeowners skip this critical step. If you want your new sod to thrive, it's important to start with the right foundation. First, eliminate any debris, rocks, and old grass to secure a clean surface. Next, test the soil pH and nutrient levels; you might need to amend the soil with compost or fertilizer. Aerate the top 2-4 inches of soil to encourage root penetration, and avoid compacting it too much. Finally, ensure the ground is level to prevent water pooling. Taking the time to prepare your soil correctly can make all the difference in achieving that lush, green lawn you envision.
Ignoring Irrigation Schedule
Many homeowners underestimate the importance of a consistent watering schedule after installing sod, which can cause disappointing results. Immediately after laying the sod, you need to thoroughly soak it to help the roots establish. For the first 14 days, water daily, ensuring the soil keeps moist but not soggy. As the sod begins to root, you can gradually cut back the frequency to every other day, then to twice a week. Remember, during hot or windy days, you might need to change your watering to prevent drying out. Ignoring this schedule can cause your sod to brown, die, or wilt. So, check moisture levels, and you'll be on your way to a lush, green lawn.
Maintaining Your New Sod for Long-Term Health
To make certain your new sod prospers for years to come, you'll need to concentrate on consistent care right from the start. Begin by watering your sod generously and frequently, especially during the first few weeks. Once established, cut back watering to about once a week, but adjust based on weather conditions. Mow your sod consistently, but never cut more than one-third of the grass height at once. Nourish your lawn at least twice a year with a balanced fertilizer to keep it vibrant. Keep an eye out for weeds and pests, handling any issues promptly. Finally, aerate your lawn yearly to stimulate root growth and improve soil health. With consistent effort, your sod will flourish beautifully for years ahead.
Questions and Answers
What Is the Timeline for Sod Root Establishment?
Your new sod usually takes around two to three weeks to root properly, depending on weather patterns and soil composition. During this establishment period, keep it well-watered to stimulate healthy growth and strong roots.
Is It Possible to Install Sod During Winter?
Installing sod during winter is possible, though it presents challenges. Root establishment is slowed by cooler conditions, and frost has the potential to injure the lawn. When installing, make certain to provide appropriate care and observe temperature patterns for the greatest likelihood of success.
What Tools Do I Need for Sod Installation?
You'll require a few essential tools for sod installation: a shovel, rake, lawn roller, sharp knife, garden hose, and a measuring tape. These items will help you prep the space and ensure a smooth installation.
Should You Walk on New Sod?
You should avoid walking on newly laid sod for at least a couple of weeks. This provides the grass time to root properly. If you need to, walk carefully and limit traffic to stop damage.
What Are the Signs That My Sod Is Healthy?
You can determine if your sod is healthy by inspecting its moisture, color, and texture. Search for lively green blades, a smooth feel, and wet soil underneath. If it bounces back when stepped on, it's healthy!